Bonjour à tous / hello everyone !!
Welcome back to FLAWLESS BEAUTY BLOG BY NAKIBA, I hope you all are fine. I’m great, I had a wonderful week, I’ve learnt such much. It’s amazing…
This week’s topic is all about how to contour and highlight narrow nose.
BALANCE YOUR NOSE SHAPE
Contouring and highlighting is the art of applying skillfully to create the trompe l’oeil effect of altered bone structure. I am here to give you give you my best beauty tips and tricks on to contour and highlight to enhance your nose. A narrow nose is considered to have very thin, narrow bridge.
For a narrow nose, the goal is to create the illusion of a widening effect, by doing this, the nose will appear more defined.
A corrective full-face makeup is like magic, contouring the nose helps achieve colour balance for the whole face. A nose is considered flat when the bridge is flat or undefined and a tip doesn’t protrude outwards. It also tends to be wide.
For a flat nose, the goal is to create the illusion of a more sculpted bone structure, by doing this, the nose will appear more defined.
HOW TO TELL IF YOU HAVE A FLAT NOSE
- You have a very thin and narrrow nose bridge.
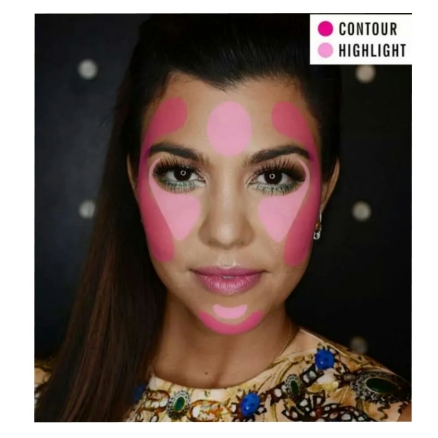
CONTOUR
Contouring is the art of subtlety defining or reshaping features, like your cheekbones, nose, forehead and chin, using makeup. By using matte powder, cream, liquid or pencil product that’s two shades darker than your skin tone can enhance, define and even re-shape your features.
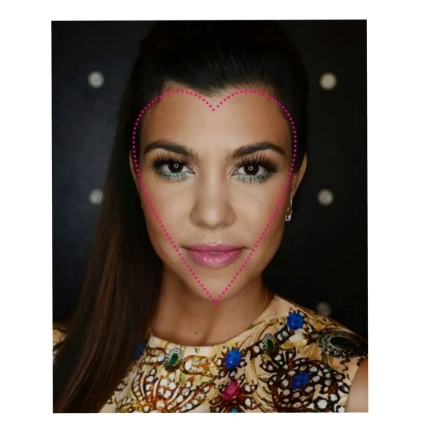
WHERE YOU SHOULD CONTOUR
- Apply to your contour color on the sides of the nose in a backward C-Shape motion, following the natural curve of the nose.
HIGHLIGHT
Highlighter attracts and mimics lights, offsets contouring by accentuating areas of the face with light concealer or highlighter giving the illusion of higher, brighter features. To properly highlight, use a concealer shade that is two shades lighter than your skin tone or a highlighter that flatters your complexion to emphasize the areas of your face that naturally catch the light.
WHERE YOU SHOULD HIGHLIGHT
- Apply highlight product on the bridge of your nose.
Continue reading to find out the steps on how to contour and highlight large nose…
STEP 1
Prep.
Prepare your skin for facial makeup application.
PRODUCTS
CLEANSER

Clean your face and chin area and neck.
Cleanser is a facial care product that is designed to clean the surface of the skin and to remove makeup dead skin cells, oil, dirt and other types of pollutants from the skin of the face. This helps to… https://beautyblogbynakiba.wordpress.com/2017/04/10/what-are-facial-cleansers/
Note: Always apply makeup to clean skin !
TONER

Apply toner.
Toners, also known as fresheners or astringents, are designed to lower pH of the skin, loaded with beneficial ingredients that can transform the way your skin looks and feels after cleansing and to help remove excess cleansing milk. The purpose of a toner is to… https://beautyblogbynakiba.wordpress.com/2017/04/17/what-are-facial-toners/
MOISTURIZER

Apply moisturizer.
Stay tune, I’ll cover this topic next month !
FACIAL PRIMER

Apply facial primer.
If you are not familiar with it, primer probably seems like an unnecessary step, but if you don’t use it you will never know why makeup artist are obsessed with it.
Makeup primer is a… https://beautyblogbynakiba.wordpress.com/2017/06/05/what-are-face-primers/
Note: Use an oil free moisturize on your face and all along your chin and neck area and let it absorb for a minute.
APPLY ALL FACIAL PRODUCTS IN THAT ORDER.
STEP 2

Conceal blemishes and redness.
Apply color correctors where needed. This will help take away most of the redness from uneven complexion and breakouts. If you have dark circles or want to brighten your eyes.
You must set with a translucent powder.
Find out what is translucent powder in the link below.
https://beautyblogbynakiba.wordpress.com/2017/02/20/what-are-concealer/
STEP 3

Choose your foundation.
Whether it’s liquid (or cream) foundation, oil based foundation makeup, sheer foundation, waterproof foundation, mineral foundation, powder (or compact) foundation, stick foundation, mousse or whipped or matte, or “oil-free”, foundation.
Choose a foundation that identically matches your skin and is best for you skin type.
Find out what is foundation and which one is best for your skin type in the link below.
https://beautyblogbynakiba.wordpress.com/2017/02/13/what-are-foundations/
STEP 4
Starting from your brow bone, draw a soft dotted line down both sides of your nose, using a lip liner pencil. Make sure the doted lines thin.
STEP 5
Now join the dotted lines to create more define lines. Both lines must end on your nostrils almost at the tips of each side.
Use an angle brush to draw the contour lines. They should begin at the brow and end to your preference.
TOOLS FOR THE JOB
ANGLE BRUSH
STEP 6
Lightly apply the highlight in a thin line starting from between the brow down the nose bridge and fill the space between the two lines. Keep the line steady and symmetrical, but feel free to play with the width (depending on how narrow you want your nose to appear). Blur the area where the nasolabial lines (commonly known as “smile lines or “laugh lines) connect to the nostrils by applying your highlighter shade in dots just besides the nostrils. Blend gently with your ring finger.
TOOLS FOR THE JOB
CONCEALER BRUSH
STEP 7
Use a concealer brush or a beauty blender to buff out your lines. Do not blend your contour lines into the highlight or it will look muddy. Blend carefully for a natural appearance.
TOOLS FOR THE JOB
BEAUTY BLENDER
CONCEALER BRUSH
STEP 8

Finally, once you get all your contouring and highlighting, you want to seal it all with some loose powder.
Find out what is loose powder in the link below.
https://beautyblogbynakiba.wordpress.com/2017/02/20/what-are-concealer/
TIPS
The contour shade you choose for your nose must be lighter than the one you use on cheeks and the rest of your face and it should be matte. Whether you’re using a cream or powder it always must be cool tone. Cool tones mimic the natural contours and shadows of the face.
Avoid placing cheek color close to the nose. The closer together you place your contour lines; the slimmer your nose will appear.
If your skin tone is pale to medium, you’ll want to reach for matte, cool toned contour. Look for beige, taupe and greyish tones. If you have tan to deep skin, cool tones also work for you, but warmer shades can look great as well.
If you want the heavily contour Instagram look, or if you are more advance at makeup, try a cream. Cream will really sculpt your features. Powders give more subtle results. Liquid highlighters are going to give your skin a dewy, more natural looking finish.
Starting with a light hand, it’s easier to build product than to take it off.
The contour shade you choose for your nose must be lighter than the one you use for your cheeks and the rest of your face. Whether you’re using cream or powder it always must be a cool tone. Cool tones mimic the natural contours and shadows of the face. ORANGE IS A NO!
Remember to build gradually the shadow because too much foundation and powder will make your nose look dirty. Then blend, as it is the key to contour.
Skip Moisturizer. Skip the nose when you’re applying moisturizer before makeup.
Mattify. Look for makeup primer or moisturizer that have mattifying property to keep shine off for longer hours.
Powder Power. Powder helps to soak up excess sebum. Slap on more powder around the nose, but making sure the finish still looks natural.
CONCLUSION
In this discussion, we have tried to describe to contour and highlight narrow nose, you also have an idea what tools you can use.
Best of luck!!
**********************************
I hope you found something useful among these tips! If you have any other tips to share, please leave a comment, as the discussion is likely to benefit many other flat nose beauties looking to contour and highlight their nose
I’d be very grateful if you’d help to spread it by emailing it to a friend, or sharing it on Twitter or Facebook.
Stay tuned next Saturday, I’ll post about “HOW TO CONTOUR AND HIGHLIGH TURNED UP NOS”.
See you soon.
THANK YOU!!!